So you bought yourself a camera…congratulations! Now comes the tougher part of trying to figure out all the knobs and buttons. Unboxing your camera is such a great moment, but that moment is usually overshadowed by the next part—figuring out how to set up the basic camera settings, especially for beginners. And if you’re anything like most of my students, trying to find the “on” button is just as difficult as trying to figure out what photographers mean when they say exposure triangle (eww…so technical).
I’ve done this whole photography thing for over two decades, and every year I teach this exact guide to beginners who have never even held a camera in their hands—so I promise you are in good company. This guide will go over the essential camera settings you should change before you start taking photos, and will give you an excellent foundation for all your photos to come. Think of it like a tune up for your camera. It’s almost a set-it-and-forget-it guide.
How Camera Settings Work Together
Before we actually jump into the exact setup, and the nitty gritty of some of that. There is one concept that will make all of this easier to understand. Your camera has three main settings that control your images:
- ISO –> controls brightness
- Aperture –> controls background blur
- Shutter Speed –> controls motion
These three elements work together to control how your images look. But here’s the really important part. You do not need to master all three settings in order to create beautiful images that match your vision.
This article will discuss easy to understand, beginner camera settings that can be implemented today, without the overwhelm of those academic settings. If you do want a deeper dive into how all 3 of these settings work together, I walk through it here in my exposure triangle for portrait photographers guide. Let’s simplify everything and walk through exactly what to change first.
The 3 Things You Need To Setup First
There are 3 areas that matter most when you unbox that new camera.
1. Turning Off Auto ISO
2. Shooting Mode (aperture priority or shutter priority)
3. Back-of-Camera Settings
These all connect together to make some really important changes. It starts with my least favorite automatic setting, auto ISO, which we will turn off immediately. Then shooting modes to get you off that dreaded green square (soccer moms love the green square). And finally to some more advanced back of the camera settings that seem scary, but once they are set you’ll likely never need to make any changes to them again. Let’s look at them one by one.
ISO Settings For Beginners
If there is one setting that quietly ruins beginner photos, it’s auto ISO. So before you do almost anything else:
>> Turn off Auto ISO immediately. <<
I know that seems over the top, but it actually isn’t. As someone who has taught hundreds of new photographers, the factory setting auto ISO is almost always the reason a photo looks [insert any of your biggest photo issues here—blurry, dark, bright, grainy, or just off].
I realize it seems scary and even counter-intuitive to shut off that setting because letting the camera decide for you feels really safe. But in reality, auto ISO is what keeps you stuck because you can’t pinpoint why your photo doesn’t look the way you want it to.
This is the first setting I change on any new camera that I get in my hands. I’m not going to tell you that this will instantly fix all of your photo issues, but it might. The more you understand ISO and what it actually does, the better your photos will come out.
What ISO Actually Does
ISO controls your camera’s sensitivity to light.
- Low ISO = less grain or noise, best used on bright sunny days
- High ISO = more grain or noise, best used indoors where there is less light
Think of it as a backup brightness tool. In darker situations you need a higher ISO number to make the camera more sensitive to light, but you’re also inviting in more digital noise to your image. In bright situations you can use a lower ISO because the camera has plenty of natural abundant light to use, and this allows far less digital noise in your image.
It’s just like turning up the feed on a microphone to hear the person better. You will hear the person better but also hear background buzzing because you increased the microphone sensitivity. It’s the same with ISO.
The ISO Settings Beginners Need To Know
Use this as your baseline:
- ISO 100–200: bright outdoor light
- ISO 400: everyday shooting (start here)
- ISO 800: indoors / lower light
- ISO 1600+: very dark situations, night
If you’re unsure, start at ISO 400. 400 is where I start all of my beginner students because it works in most daylight situations and gives a solid starting point.
You may have heard “keep ISO as low as possible at all times” and while the sentiment is true, there are absolutely times when increasing your ISO will actually save your photo. Do keep your ISO as low as possible, but do not be afraid to raise the ISO to get a better photo.
Biggest Beginner Mistake With ISO
Setting the ISO once and never changing it.
I change my ISO all the time. It’s not a one-time setting, it will change depending on your available light. For example, on a wedding day I will likely have 4-5 major ISO changes throughout the day—200 for outdoor couples portraits and group portraits, 400-800 during brighter indoor getting ready photos, 1600 inside the church or ceremony location, 2500+ during a reception (with flash). And even those settings will change rather quickly when you walk from inside to outside or vice versa. But if the light doesn’t change drastically (say during a one-hour outdoor portrait shoot) the ISO stays the same the whole time.
The Best Shooting Mode For Beginners (And When To Use Each One)
If you’re still using AUTO mode (or that little green square), this is a easiest change to improve your photos. No, I’m not going to tell you to jump into full manual mode (that would be crazy). In fact, I don’t recommend that for beginners at all.
Instead, start with the camera’s semi-automatic modes:
- S / Tv (Shutter Priority)
- A / Av (Aperture Priority)
These two modes help you move toward manual mode without overwhelming you. They control a single aspect of your metering, one at a time, so your camera acts a bit more like a point-and-shoot, but in reality you are controlling some of the settings.
Shutter Priority (S / Tv): Best For Motion or Movement Control
I would choose shutter priority if motion and movement were the most important aspects of the photo I was taking. This would be for things like children running, sports photography, wildlife, or anything moving fast.
When you choose shutter priority, you set the shutter speed and your camera chooses the correct aperture to give you a properly metered image. Shutter priority mode will show up as S mode on a Nikon or Sony, and the Tv mode on a Canon.
So…what the heck is shutter speed? Shutter speed is how fast your camera shutter opens to allow light into your camera to touch your sensor. Shutter speed is measured in fractions of a second, so 4 is actually ¼th and 8 is 1/8th of a second and 1000 is actually 1/1000th of a second (that’s very fast).
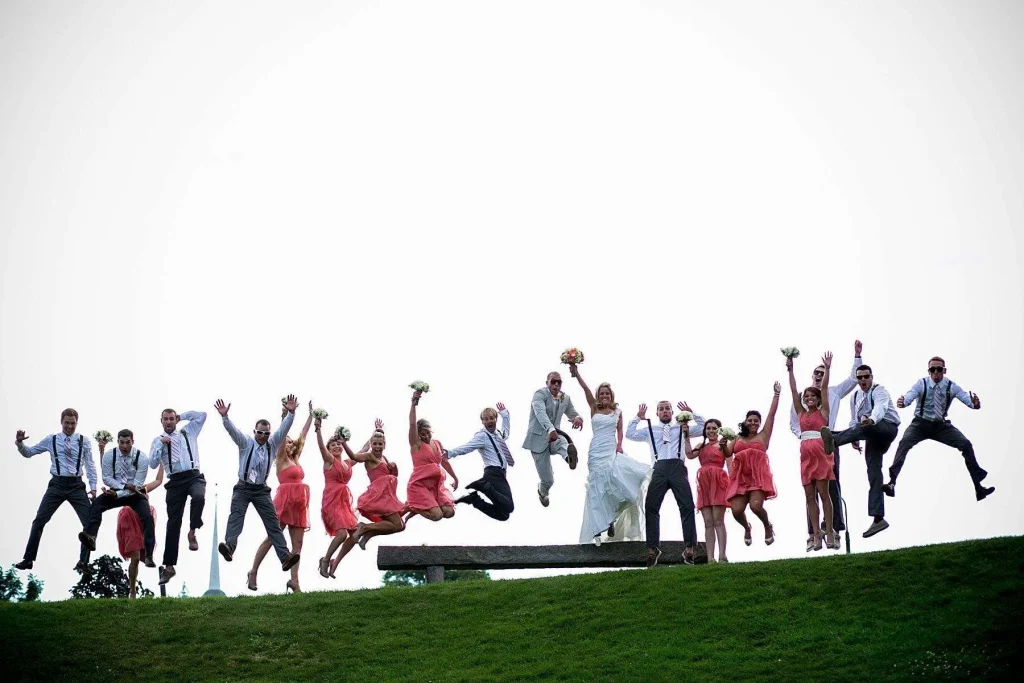
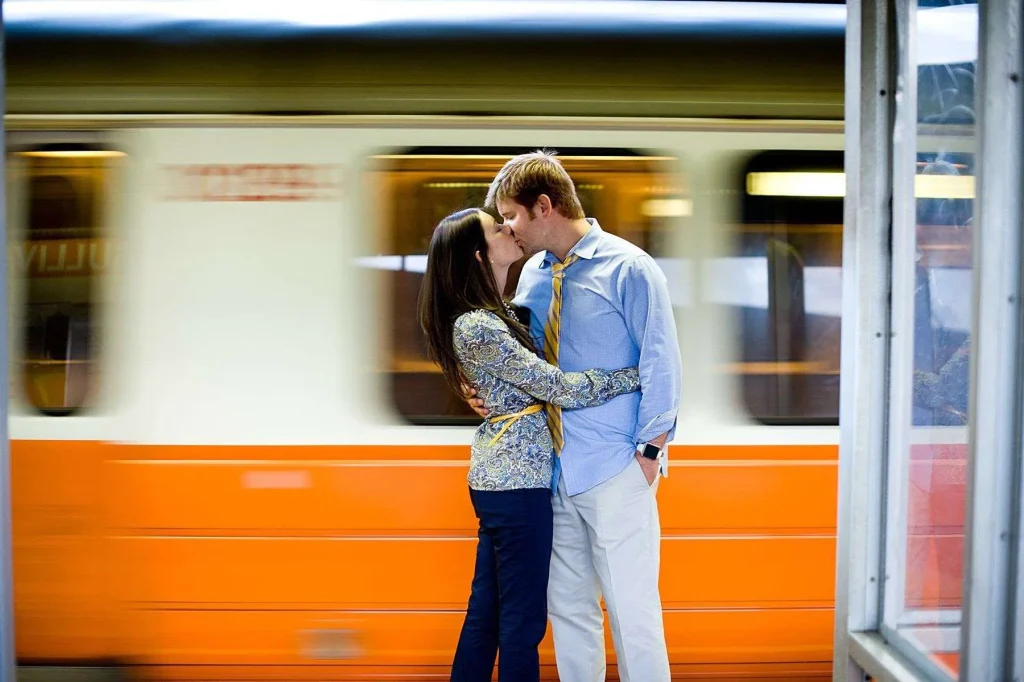
Because shutter speed controls motion and movement in your photos, you need to choose the correct setting for the scene in front of you. If I want the background to have motion blur like the below image on the right, I need a very low setting (below 30). And if I want to freeze action like the image on the left, I need a very high shutter speed (1000+).
Aperture Priority (A / Av): Best For Background Blur
I would choose aperture priority if background blur (called depth of field) was the most important aspect of my photograph. And as a wedding and portrait photographer, subject isolation and blurry backgrounds are always going to be most important to me. You should choose aperture priority if you are photographing people, portraits, or anything where you want that gorgeous out of focus background that we call bokeh.
Aperture priority works the same way (fundamentally) as shutter priority, but this time you control the aperture and your camera chooses the correct shutter speed to give you a properly metered image. This will be the A mode on a Nikon or Sony, and the Av mode on a Canon.
Aperture is the opening inside the lens of your camera. It controls how large the opening is that allows light into your camera that passes through the shutter. Aperture is also often referred to as f/stop—the terms are completely interchangeable. Aperture is made up of some strange numbers (2.8, 5.6, 22, etc.). It controls how much of your photo is in focus, called depth of field. A large number means everything is in focus, where a small number focuses clearly on a single object (called shallow depth of field).
Back in the beginning of my wedding photography business I hired a second shooter who was not a traditionally trained photographer. So I taught him to use aperture priority and keep his aperture number very low. This allowed him to be able to photograph quickly (very important on a wedding day), and still be able to match my style without too much overwhelm in thinking about camera settings.
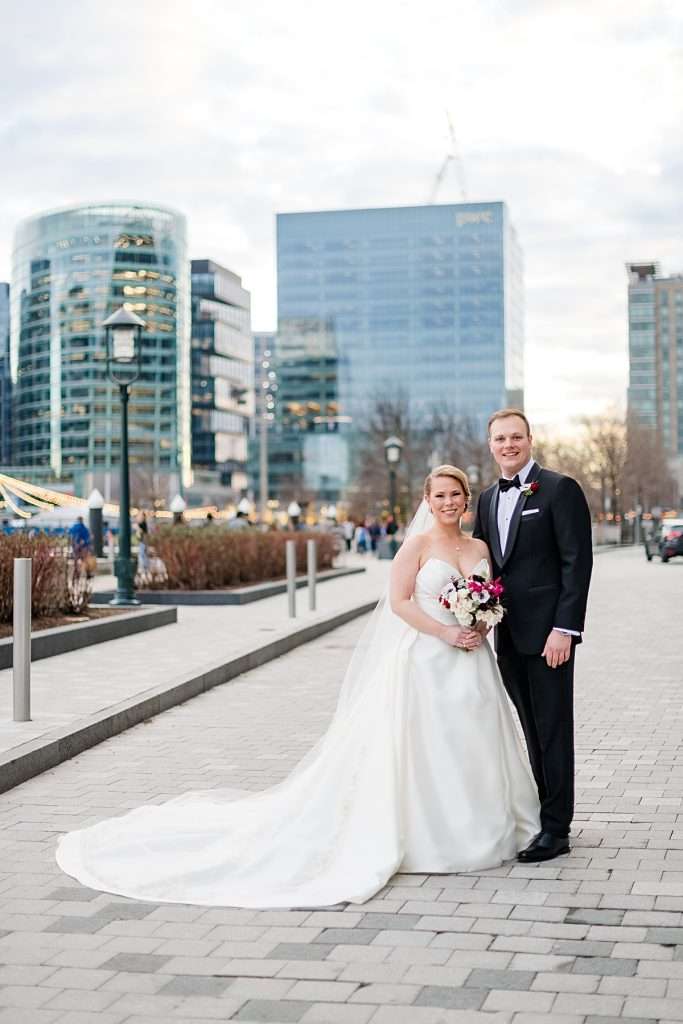
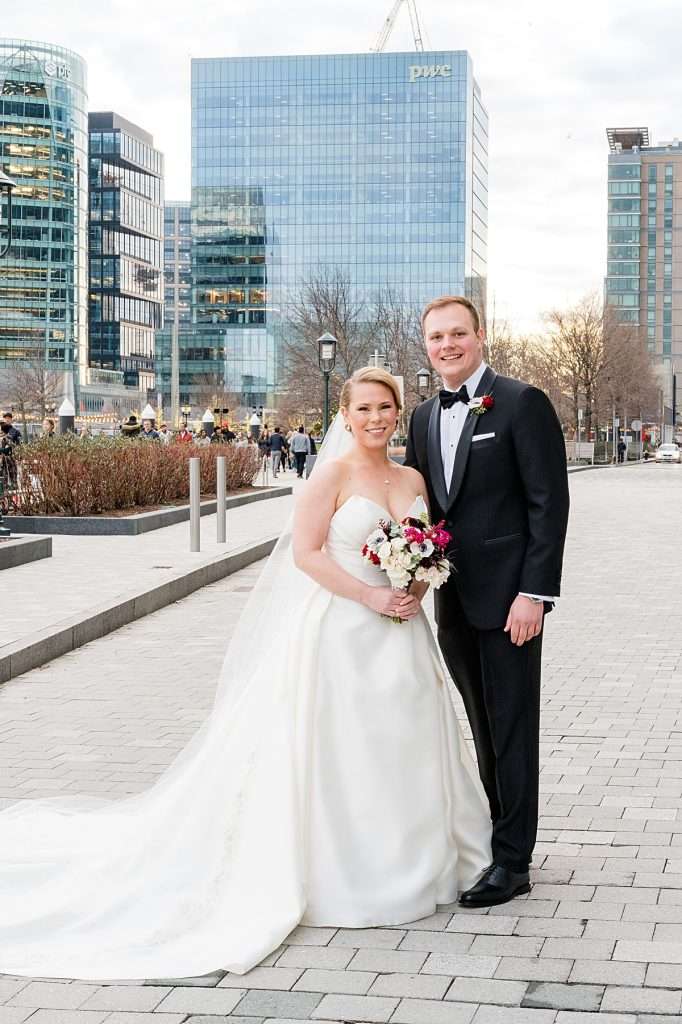
The top right image is an example of an photo that feels too busy because of all of the distracting elements. And this was purely because of the deep depth of field. I show these two above examples because my clients’ wanted the building in the background in focus for this shot (it was important to them)—but I knew that would make the people around them really noticeable. So I took two shots to be able to blend them together in post production. Take note of how the trees, the lights, the people, and even the bricks change with the different f stops.
Fix Your “Back of Camera” Settings
The back of the camera has many settings (called the i-settings on a Nikon, or my-menu settings on a canon). These settings make a huge difference in how your images turn out. Let’s simplify them.
Quality
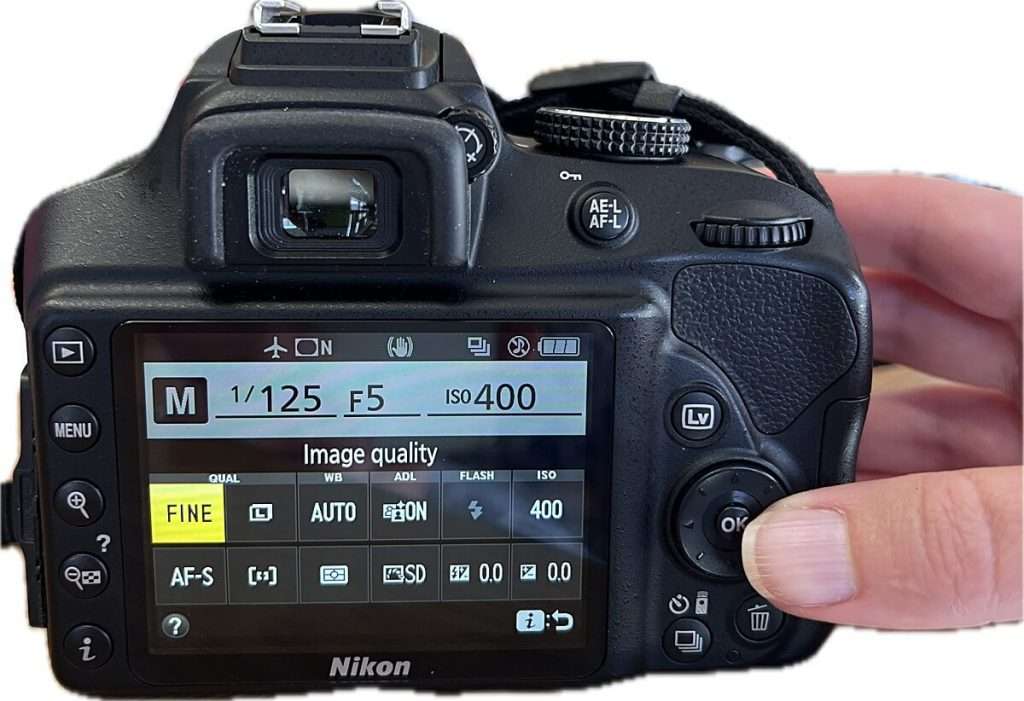
This can be set to RAW if you want more editing capabilities, or for beginners I often suggest JPEG FINE & LARGE. These settings work well when you are still experimenting.
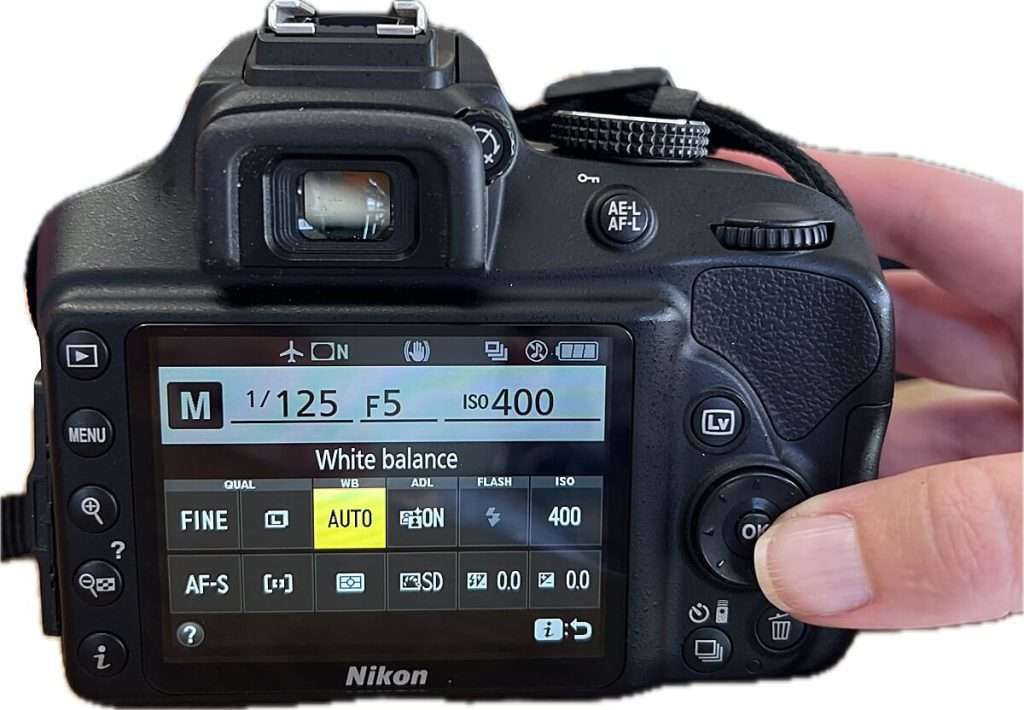
White Balance
I generally suggest starting with AUTO WB. As you get better with understanding the white balance you can change these settings, but AUTO is totally fine to start with
Focus Mode
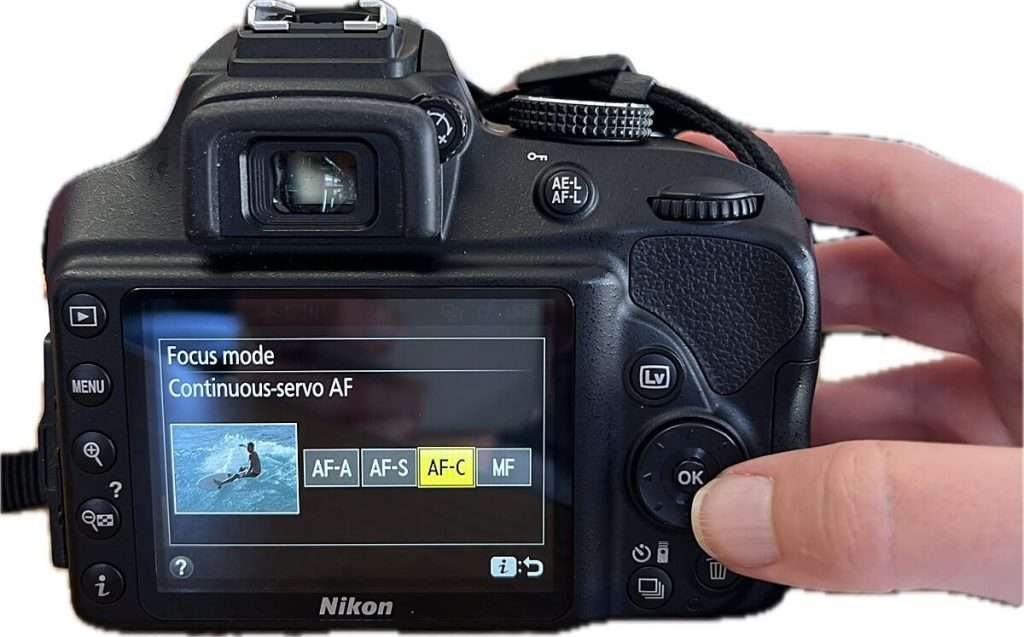
AF-S, ONE SHOT, or AF-C are my favorites. AF-S is single-shot focus (meaning it focuses once) AF-C for continuous focusing (meaning it re-focuses while you change your framing). I suggest one shot for beginners, but my favorite is continuous.
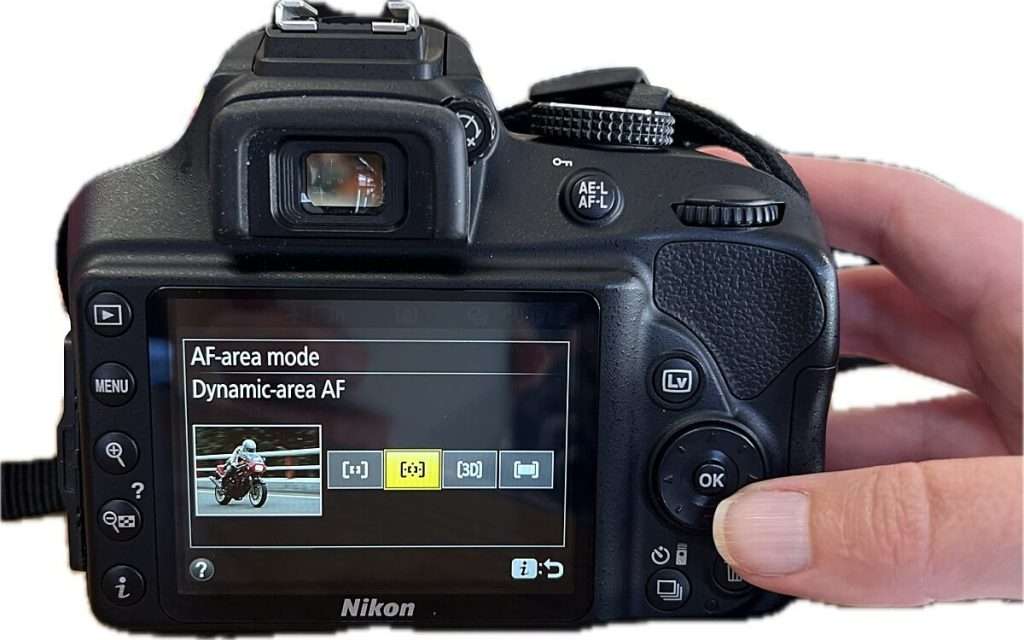
Area Mode
On a Nikon you will see Focus Area Mode (not on Canon or Sony). I choose dynamic or single point AF so I can move around where I want the camera to focus. Stay away from AUTO if you want to control your focus points.
ISO
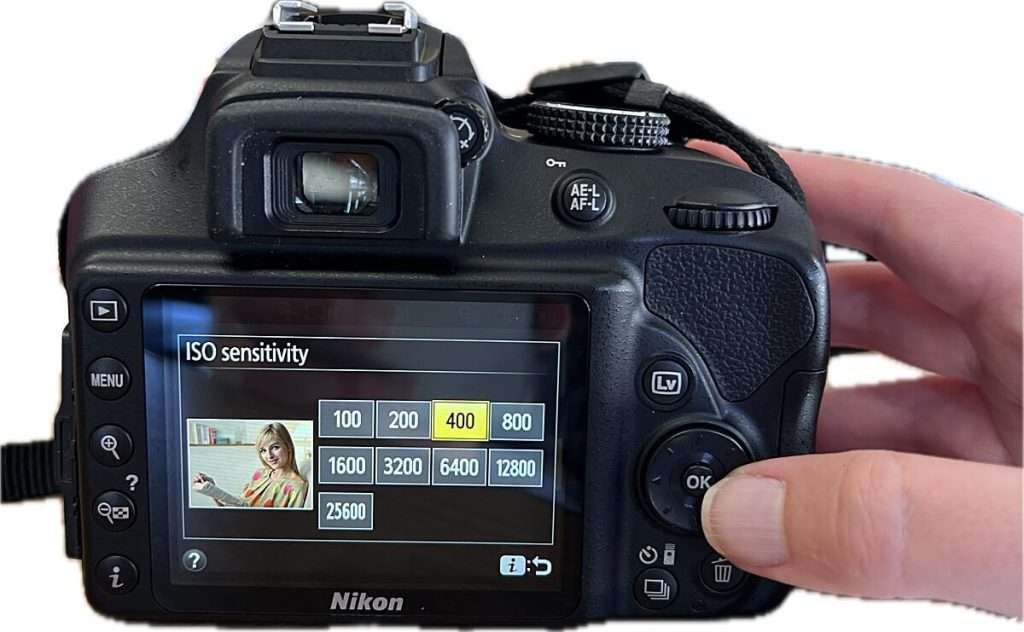
This should be set to 400 to start. If it is still on auto, I show you how to change that in section 1. 100-200 for bright sunlight outside. 400 for “regular” settings. 800-1600 for darker/indoor lighting
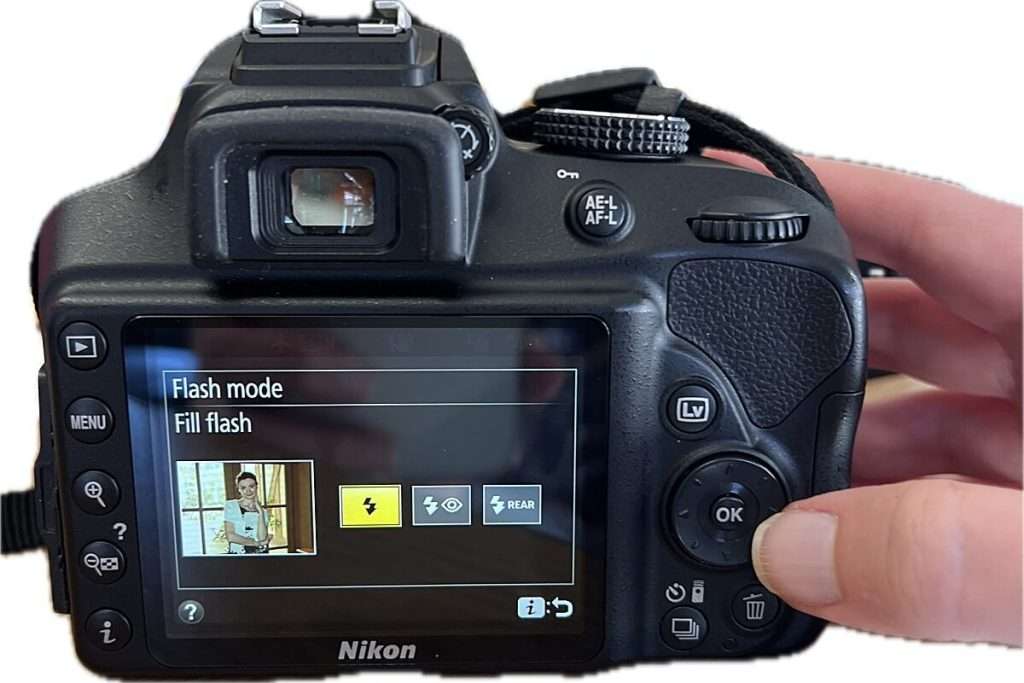
Flash
I don’t suggest new photographers and beginners use the on-camera flash and instead start to control the light they have available. But I set this to FILL LIGHT to begin with just in case it needs to be used. Fill light is slightly cleaner (fuller) than the other settings.
Active-D Lighting
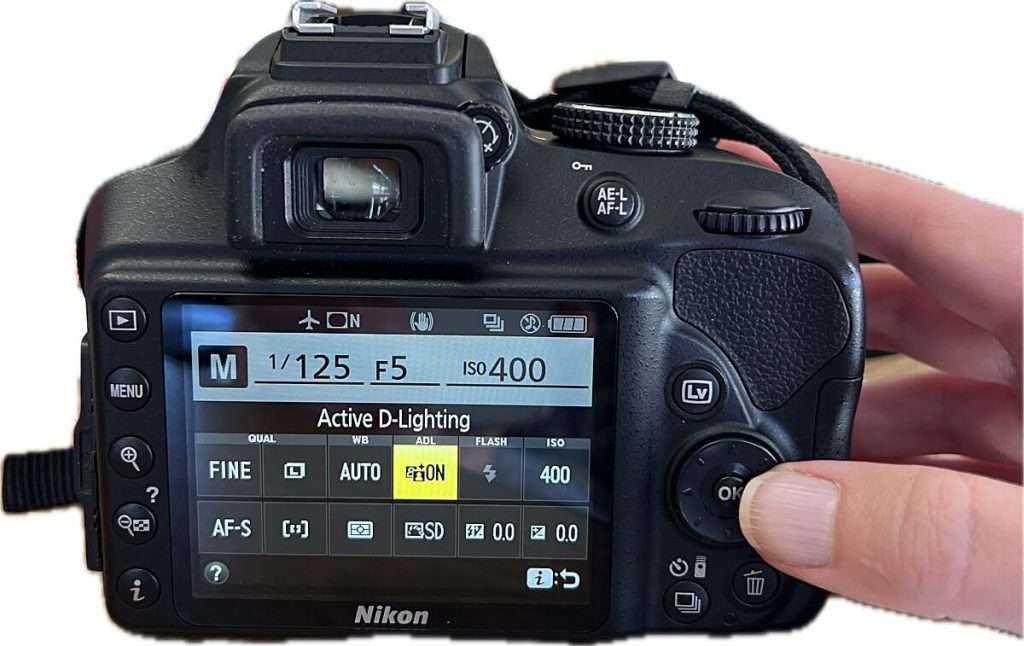
I leave this setting OFF. This helps bring out highlight and shadow detail in bright lighting, but I prefer to do that in editing. You can test to see if you want this ON.
Metering Mode
Metering mode tells the camera how you want to meter the scene in front of you. I suggest matrix metering, which takes into account the full scene. The other two are spot metering and may not do what you want.
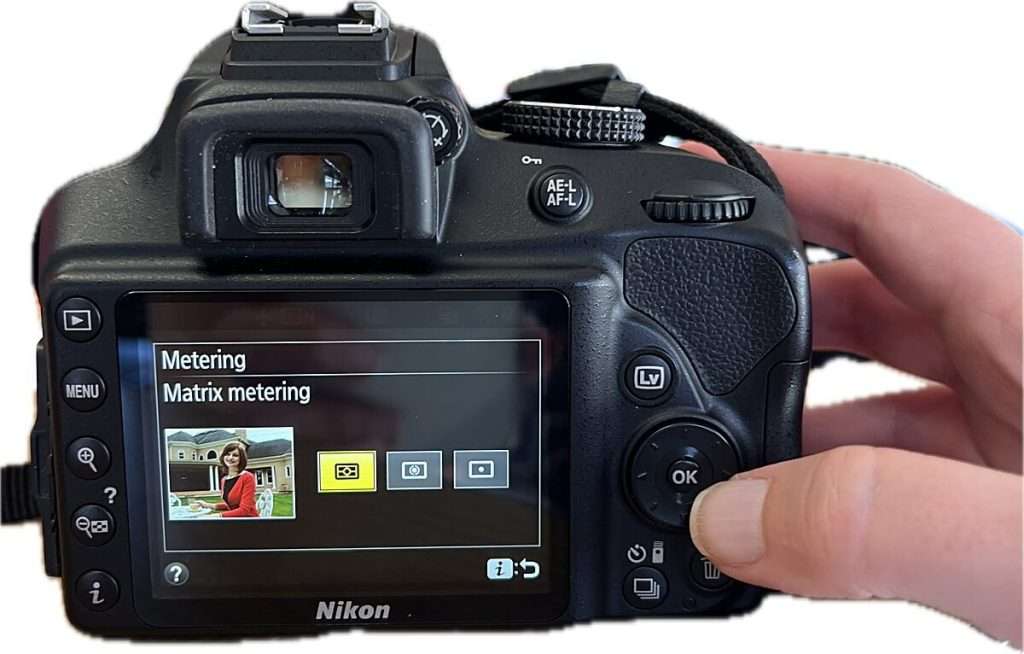
Picture Control
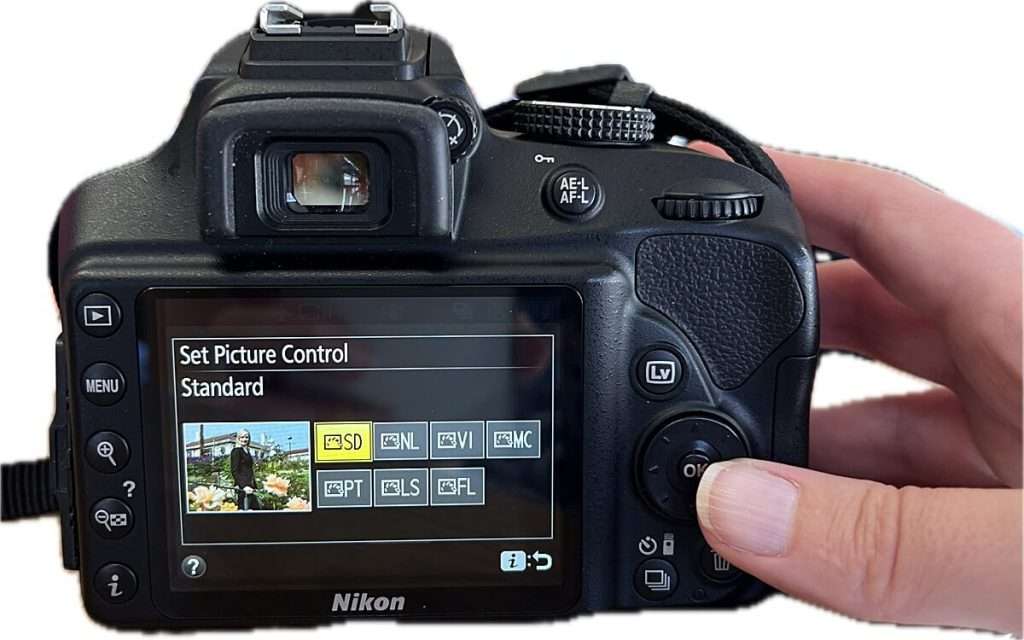
The picture control affects the contrast & color of the image. I suggest SD or NL (standard or neutral) to start with. This gives you a more level contrast to edit from. Note that if you’re shooting in RAW this doesn’t actually matter much, but will show in the back of the camera preview (which is always a jpeg).
Exposure + Flash Compensation
Leave both of these set to 0.0. If they are set to anything else, it will be overexposing or underexposing your photos. We want to control our exposure first.

Putting it All Together: Quick Setup
So if you are still wondering what are the major takeaways and the things that must be changed, here is a quick setup for you.
| Setting | What To Use | When To Change It |
| ISO | 400 | increase in low light, decrease in bright light |
| Shooting Mode | Aperture Priority (A/Av) | switch to shutter priority (S/Tv) for motion |
| Aperture | f/2.8-f/5.6 | lower for more blur/higher for more focus |
| Shutter Speed | auto (when in A/Av mode) | increase to freeze motion, decrease for blur |
If you don’t dig into all of the settings inside the camera (and I know there are lots of them) then the above settings will get you there quickly without tons of second guessing.
Step 1: Turn off Auto ISO
Turn off auto ISO and choose 400 to start with. This is going to be your default starting point. I’ve used this setting with beginners for 20 years (seriously) and it works every single time as a starting point.
Don’t forget to increase your ISO if it’s a bit dark or your images are coming out blurry. Decrease your ISO if everything looks too bright or you’re out in bright sunlight. Don’t overthink it too much, just adjust based on the scene in front of you.
Step 2: Start with Aperture Priority (A/Av)
Using this semi-automatic mode will change your way of photographing entirely (especially if you’re coming off of auto mode). Set this as low as your camera goes—this will give you that background blur you’re likely looking for without needing to change other settings. It’s the first mode I teach beginners, and when I was not yet using full manual mode myself this was my go-to setting.
Step 3: Let Your Camera Handle Shutter Speed
When set to A/Av, your camera will choose the shutter speed it thinks is best. This is fine, honestly, as long as your photos are not dark or blurry. If your photos are blurry then your shutter speed is too low. Try going to brighter light or raising your ISO.
If all of this feels like a lot, just remember the following:
Start with ISO 400 + Aperture Priority (a/Av) + f/1.8-5.6
This will work in most situations and is definitely the fastest way to get off of AUTO mode.
Still Feel Overwhelmed?
I know that any full camera settings guide is going to feel really “tech heavy” even when I have my teacher hat on. So if this is still feeling really overwhelming, try the free mini course of how to get off auto mode.
This mini course goes into depth about shooting modes, and touches upon ISO and other camera settings. The point is not to get discouraged when trying to set up your new camera. I assure you that these settings have helped all of my students feel more successful with a camera in their hands.